What is Shopify flow and how to use it
If you’re a Shopify Plus customer looking to automate repetitive tasks on your store, Shopify Flow is what you require. Dealer make extensive use of the Flow workflow language and runtime engine to personalize Shopify, automate tedious repetitive tasks, and focus on what matters most. Now, we are going to talk about Shopify Flow and how to use it.
What is Shopify Flow?
Shopify Flow is an Ecommerce automation platform that allows you to automate tasks and processes in your store and across your apps.

Operation is very simple, even for beginners with no programming or development experience. Furthermore, it is presented through an intuitive and easy to use interface, which simplifies the development of automated procedures. Ideally, companies can create custom workflows in just a few clicks using the three-step visual builder, using triggers, conditions and action logic. Automated workflows can be customized in your browser by Shopify experts, or you can choose from pre-built templates.
How does Shopify Flow work?
Like other Shopify apps, Shopify Flow can be downloaded from the app store and installed on your dashboard. You will be able to find Shopify Plus on your Shopify Plus store dashboard once it is integrated.
Shopify Flow will save you a lot of time. The control panel provides a simple user interface with just a few buttons. All of the steps required to get started with automation may be found in the dashboards templates section.
Create a new workflow
Steps:
- From your Shopify admin, click Settings > Apps & Sales funnels.
- From the Apps and Sales funnel page, click Shopify Flow.
- Click Open Application.
- Click Create Workflow.
- Click Choose trigger , then select the trigger that starts the workflow.
- Click Output to create a new step. Click on Condition and select condition meet it before taking any action.
- Then click the action to take when the condition you specified is true. Click Actions and choose an action to run based on the result of the condition.
- Optional: click Otherwise to add to your workflow if the condition you set is false. You can add additional conditions or actions.
- Click New Workflow , and then enter a title for your workflow.
- To start using your workflow, click Enable Workflow.
View details to run the workflow
To view detailed information about an individual workflow, click the workflow name.
The Status section indicates whether the workflow has been completed.
The Actions section shows how many actions in the workflow were successfully run. For a complete list of actions and whether they were performed, click the X successful actions.
The Run Details section shows a preview of the workflow:
- Green icons indicate conditions met and actions taken.
- Gray icons indicate conditions that have not been met and no action has been taken.
- The blue icon represents the workflow pause by the Wait action.
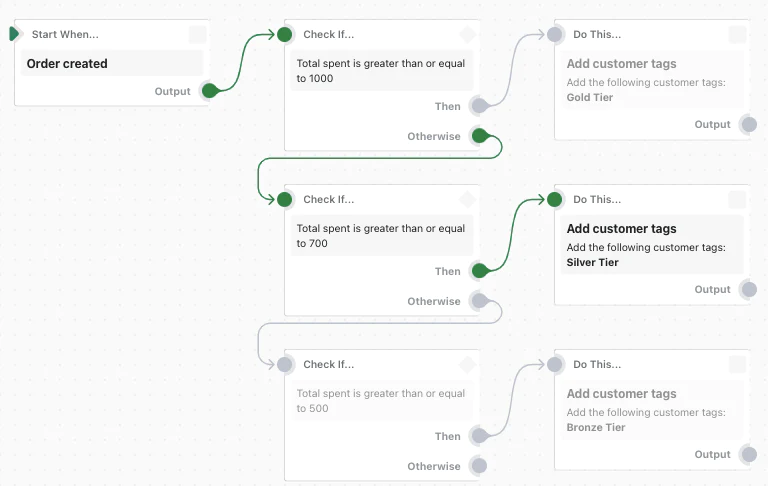
After the workflow preview, the results section provides more details.
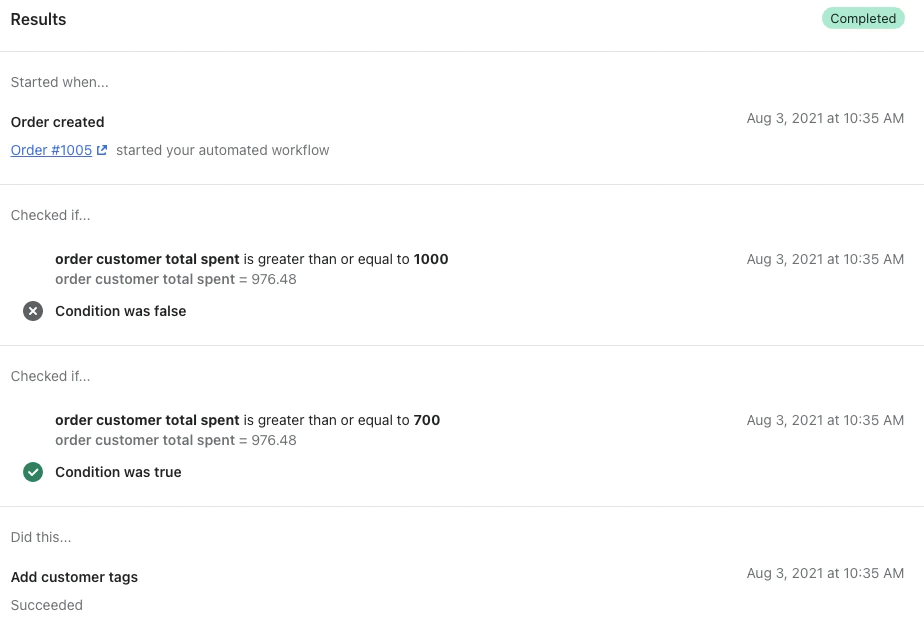
- The Start when… section indicates that the trigger has started the workflow.
- The Checked if… section shows the conditions that were checked and whether the conditions were met.
- The Did This… section shows the actions performed by the workflow.
- The Results section displays the following information, along with the date and time.
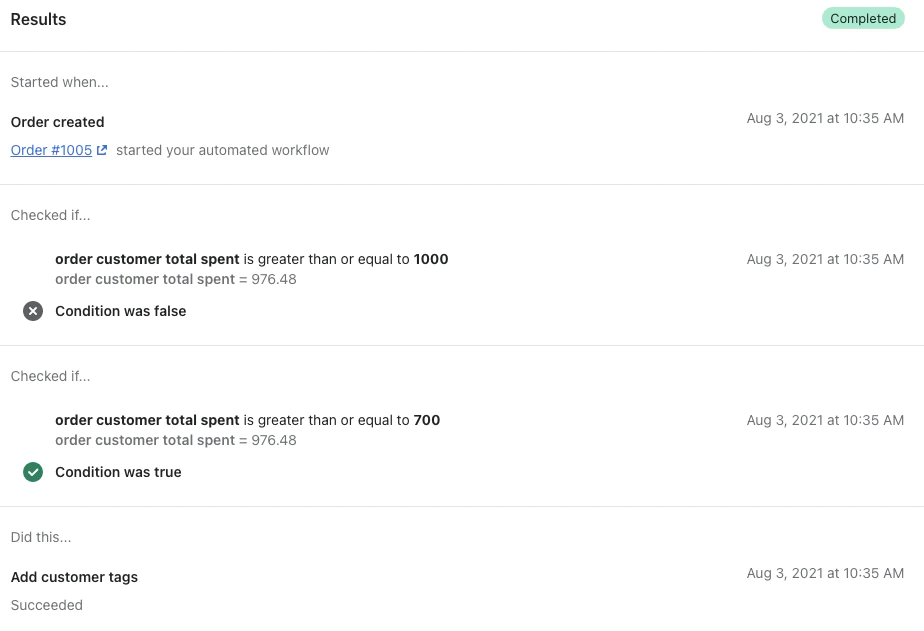
In this example, a customer places an order that brings their total in-store spending to $976.48. The Created Order trigger starts the workflow and checks the total amount spent. The total amount spent is not equal to or greater than $1000, so the workflow moves to the next condition. The following condition is met if it is greater than or equal to $700. The workflow takes action Add customer card and add Silver Tier card to the customer’s profile.
Email campaign tracking
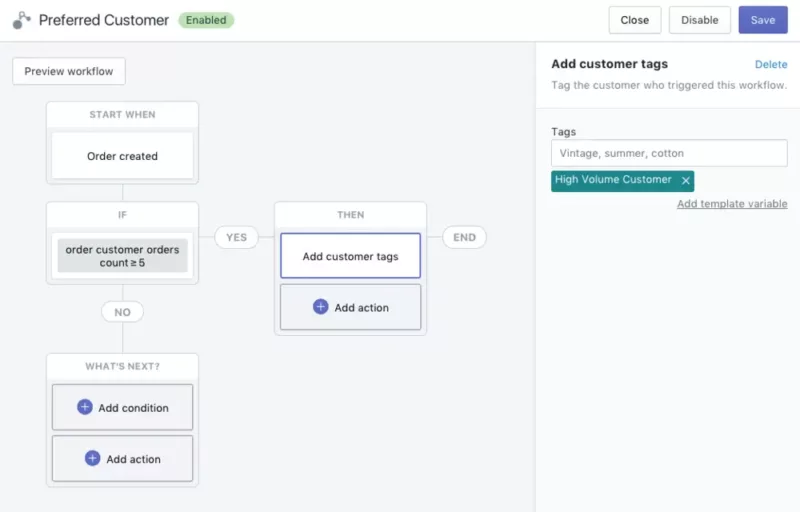
Shopify Flow’s ability to tag customers is one of its most important features. This feature is essential for many reasons, but it’s invaluable for tracking purchases made via email. As a store owner, in particular, you can identify customers based on how much they spend so you can capitalize on future marketing opportunities.
First you need to create a trigger. When you click a button, the app will suggest a list of possible triggers on the right. In this example we use the ‘order created’ trigger. The next step is to create a rule for each trigger. Then “add order tab”. A tag box opens on the right where you can enter the tag name. We will tag them as “bulk customers” or any other information at your discretion. Finally, choose another action, “Send HTTP request”, which passes customer data to an external source (in this hypothetical case, an email marketing platform).
Ideally, you can use this information to offer discounts and offers to customers who have responded positively to your email campaign.
Create urgency for low-storage items
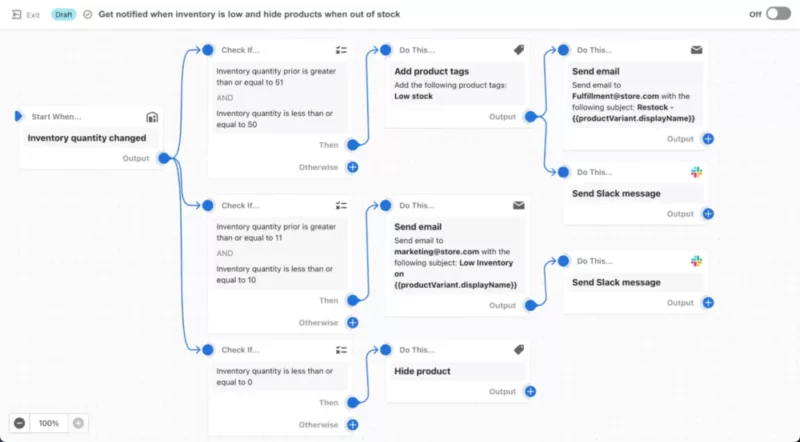
Shopify Flow makes it easy to track inventory adjustments. Plus, when product stocks run out, you can instantly add low-stock items to your Last Chance collection (or whatever your heart desires would like).
Step:
- Select “inventory changed quantity” as your trigger.
- Create a condition. You will then add the “add product to collection” action from here.
- Now select the Last Chance collection you want to add the item to. You can also tag it as “sold out” because you can add multiple actions and use it to appear on your store’s UI.
Detecting fraudulent orders will always be the top priority of any e-commerce site as it is one of the relatively painful elements of a business. While Shopify warns store owners of potentially fraudulent orders, Shopify Flow allows them to set up actions related to them.
- Select the trigger value first. In the example image above, “order created” would be a trigger.
- The next step is to set a condition. As mentioned above, you are free to add rules and conditions depending on the needs and behavior of your customers.
- Helps if you take action. You can notify your anti-fraud team through email if a suspicious order has been spotted..
Additionally, Shopify Flow lets you analyze orders that haven’t been classified as “high risk” but are still in your sights as a seller.
Shopify Flow Advantages
- Inventory is reduce.
- Loyalty and promotion
- Customers are identified based on their purchase history, postal code, email address, order history, IP address, and other criteria.
- Set up email notifications for workers when purchases or refunds are ready.
- Add new things to the collection automatically depending on the keywords in the product description.
Conclusion
With Shopify Flow, you track reviews and take action on specific negative reviews. You can organize and segment your customers depending on key metrics like customer lifetime value or current spend.
If you are still struggling and do not know what to do, contact us immediately. At ONEXT DIGITAL where we have top experts dedicated to providing services and web development on platforms including Shopify will leave you satisfied.

